How to make your own (Full)GodMode by WZ edit. Spoonfed.
Hello everyone,
I saw that there's a wz patcher for getting a physical godmode, But I
thought that it's not enough and I'm about to explain to you how to make your own
Physical + Magical godmod.
I have tried to make a patcher so you won't need to deal with it yourself but
I'm pretty new to this stuff and using Demswz I can't change what I want.
(if someone knows an easy way to change all the values please PM me)
Risks:
You'll get an annoying GM message each time you'll change channel, enter the cash shop,the MTS or re-log.
Simply click OK on the message.
I have botted with this "Godmode" for over two weeks and nothing happened
to me.
Use on your own risk.And don't forget to backup your mob.wz before.
Requirement:
HaRepacker (Download link for 4.0ⓘ, Scanⓘ)
Winrar to to open the HaRepacker (Downloadⓘ)
Brain, even infected one will work.
5~10 Minutes.
Step 1.
Right Click on the HaRepacker and click on extract here.
Click here to view the original image of 510x439px.

You will now have a folder named HaRepacker Wize.
Step 2.
Double Click on it.
Step 3.
In the Folder you'll have an icon named HaRepacker.
that looks like this:
Click here to view the original image of 885x217px.

Double click on it.
Now a window will open that will look like this:
Click here to view the original image of 677x510px.

Step 4.
Click on the "File" in the program's toolbar.
Now you should see something like this.
Click here to view the original image of 672x510px.

Step 5.
Click on the "Open" option under the "File" option.
Click here to view the original image of 673x512px.

It should look like something similar to this:
Click here to view the original image of 688x505px.

Step 6.
Now you'll need to locate your maplestory folder.
The default location for maplestory to be is:
"C:\Nexon\Maplestory"
If it's not there enter to my computer from the last window we opened and in the search , search for "Mob.wz"
After you located it, double click on "Mob.wz" and you should see something like this now.
Click here to view the original image of 668x506px.

Step 7.
Click on the tiny "Plus" sign next to the text "Mob.wz"
Click here to view the original image of 675x511px.

Now it should look like this:
Click here to view the original image of 666x505px.

Step 8.
Now we'll need to find the ID for the monster we want to make a GodMode for it.
To find the monster ID we will enter to the site "MapleTip":
http://www.mapletip.com/monster.phpⓘ
It should look like this:

Step 9.
Now, click on search bar and input the name of the monster that you want.
(I chose "Eye of time")
After you enter the name, press on the Enter key on the keyboard.
It should look like this.
(It's presenting this monster because I searched the name of this one)
Click here to view the original image of 786x598px.

Step 10:
Click on the name of the monster:
(The name is pointed by a black arrow)
Click here to view the original image of 556x387px.

This is what you spouse to see after you clicked on the name:
Click here to view the original image of 997x524px.

Step 11.
Copy the moster ID from the URL that we got.
The monster ID is the bunch of numbers we got at the end of the URL:
Click here to view the original image of 611x350px.

Step 12.
Switch to the "Harepacker" window
This one:
Click here to view the original image of 666x507px.

Step 13.
Click on "Mob.wz"
It should look like this now:
Click here to view the original image of 663x508px.

Step 14.
Press on the keyboard on "Ctrl" + "F"
It should look like this now:
Click here to view the original image of 653x495px.

Step 15.
Type in the ID of the monster(Which we found before)
and press "Enter"
*From Now on I'll reference to the "Eye of Time" as the monster you chose*
This is how it should look like:
Click here to view the original image of 667x499px.

Step 16.
Double click on the highlighted number(that has .img at the end)
It should look like something like that:
Click here to view the original image of 665x503px.

Now we'll make the physical godmode for this monster.
Step 17.
Click on the tiny "Plus" Sign next to the "Info"

It should looks like this:

Step 18.
Click on "Body attack"

It should look like this now:
Click here to view the original image of 667x506px.

Step 19.
Change the value of 1 to 0
Click here to view the original image of 595x498px.

This is what it should look like after you changed it:
Click here to view the original image of 665x503px.

Step 20.
Click on "Apply Changed Value"
Click here to view the original image of 676x510px.

Step 21.
Click on the "Minus" sign next to the "Info"
Click here to view the original image of 674x510px.

Step 22.
Understand what I'm writing:
Any monster has from 0 to 8+ kind of attacks, each attack is cataloged by "Attack1"
"Attack2" ETC..
There are two kinds of attacks(At least that's what I meet so far)
the 1st kind has a range based on LT and RB which each one has it's own
X and Y coordination.
The second one is based on "SP" and on "R"
The SP is made of X and Y and the R from a single value.
Step 23.
Click on the "Plus" sing next to "attack1"
Click here to view the original image of 668x504px.

This is what it should look like:
Click here to view the original image of 662x504px.

Step 24.
Click on the "Plus" sign next to "Info" which located under the "attack1" tab.
Click here to view the original image of 674x508px.

It should look like this:
Click here to view the original image of 667x503px.

Step 25.
Click on the "Plus" next to "Range" which located under "Info" which located under "attack1"
Click here to view the original image of 667x501px.
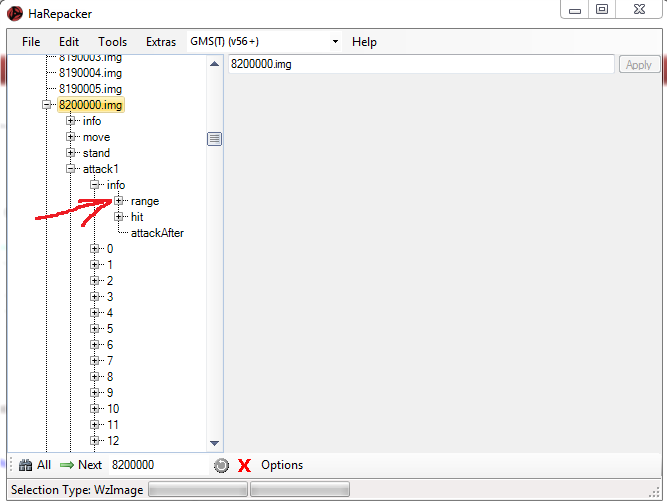
It should look like this now:
Click here to view the original image of 670x511px.

As you can see it's the first kind of attack which based on "LT" and "RB"
Step 26.
Click on "lt"
Click here to view the original image of 672x504px.

This is what it should look like now:
Click here to view the original image of 672x508px.

Step 27.
Click on the number shown in x, in my case it's "-300"
Click here to view the original image of 671x510px.

Press on "0" on the keyboard.
This is what you should get:
Click here to view the original image of 672x509px.

Step 28.
Click on the number shown in "Y" in my case it's "-200"
Click here to view the original image of 668x507px.

Press on "0" in the keyboard
This is what it should look like:
Click here to view the original image of 669x507px.

Step 29.
Press on "Apply Changed Value"

Step 30.
Do the same for "rb"
Please don't tell me that's too hard to do alone
If people will need it I'll do it later.
Step 31.
Click on the "Minus" sign next to "attack1"

This is what it should look like:

Step 32.
Press on the "Plus" Sign next to the "attack2"
Click here to view the original image of 672x507px.

This is what it should look like:
Click here to view the original image of 670x508px.

Step 33.
Click on the "Plus" Sign next to the "Info" which located under "attack2"
Click here to view the original image of 672x517px.

This is what it should look like:
Click here to view the original image of 671x507px.

Step 34.
Click on the "Plus" sign next to the "range" tab which located under the "info" tab in "attack2" tab.

It should look like this:
Click here to view the original image of 672x511px.

We can see it's second kind of attack.
Step 35.
Click on the "r" which located under the "Range"
Step 36.
Change it's value to 0.
Step 37.
Click on "apply changed value"
Step 38.
Click on "sp" which located under the "range" tab next to the "r"
Step 39.
Change it's x value to 0.
Step 40.
Change it's y value to 0.
Step 41.
Click on "apply Changed value"
Step 42.
Click on "File"
Click here to view the original image of 672x510px.
Now save it in the Maple story directory.
If there are any Errors of "directory in use" or something similar just ignore them.
I'll add the last pictures in the next few hours.
I hope you'll enjoy.
I saw that there's a wz patcher for getting a physical godmode, But I
thought that it's not enough and I'm about to explain to you how to make your own
Physical + Magical godmod.
I have tried to make a patcher so you won't need to deal with it yourself but
I'm pretty new to this stuff and using Demswz I can't change what I want.
(if someone knows an easy way to change all the values please PM me)
Risks:
You'll get an annoying GM message each time you'll change channel, enter the cash shop,the MTS or re-log.
Simply click OK on the message.
I have botted with this "Godmode" for over two weeks and nothing happened
to me.
Use on your own risk.And don't forget to backup your mob.wz before.
Requirement:
HaRepacker (Download link for 4.0ⓘ, Scanⓘ)
Winrar to to open the HaRepacker (Downloadⓘ)
Brain, even infected one will work.
5~10 Minutes.
Step 1.
Right Click on the HaRepacker and click on extract here.
Click here to view the original image of 510x439px.
You will now have a folder named HaRepacker Wize.
Step 2.
Double Click on it.
Step 3.
In the Folder you'll have an icon named HaRepacker.
that looks like this:
Click here to view the original image of 885x217px.
Double click on it.
Now a window will open that will look like this:
Click here to view the original image of 677x510px.
Step 4.
Click on the "File" in the program's toolbar.
Now you should see something like this.
Click here to view the original image of 672x510px.
Step 5.
Click on the "Open" option under the "File" option.
Click here to view the original image of 673x512px.
It should look like something similar to this:
Click here to view the original image of 688x505px.
Step 6.
Now you'll need to locate your maplestory folder.
The default location for maplestory to be is:
"C:\Nexon\Maplestory"
If it's not there enter to my computer from the last window we opened and in the search , search for "Mob.wz"
After you located it, double click on "Mob.wz" and you should see something like this now.
Click here to view the original image of 668x506px.
Step 7.
Click on the tiny "Plus" sign next to the text "Mob.wz"
Click here to view the original image of 675x511px.
Now it should look like this:
Click here to view the original image of 666x505px.
Step 8.
Now we'll need to find the ID for the monster we want to make a GodMode for it.
To find the monster ID we will enter to the site "MapleTip":
http://www.mapletip.com/monster.phpⓘ
It should look like this:
Step 9.
Now, click on search bar and input the name of the monster that you want.
(I chose "Eye of time")
After you enter the name, press on the Enter key on the keyboard.
It should look like this.
(It's presenting this monster because I searched the name of this one)
Click here to view the original image of 786x598px.
Step 10:
Click on the name of the monster:
(The name is pointed by a black arrow)
Click here to view the original image of 556x387px.
This is what you spouse to see after you clicked on the name:
Click here to view the original image of 997x524px.
Step 11.
Copy the moster ID from the URL that we got.
The monster ID is the bunch of numbers we got at the end of the URL:
Click here to view the original image of 611x350px.
Step 12.
Switch to the "Harepacker" window
This one:
Click here to view the original image of 666x507px.
Step 13.
Click on "Mob.wz"
It should look like this now:
Click here to view the original image of 663x508px.
Step 14.
Press on the keyboard on "Ctrl" + "F"
It should look like this now:
Click here to view the original image of 653x495px.
Step 15.
Type in the ID of the monster(Which we found before)
and press "Enter"
*From Now on I'll reference to the "Eye of Time" as the monster you chose*
This is how it should look like:
Click here to view the original image of 667x499px.
Step 16.
Double click on the highlighted number(that has .img at the end)
It should look like something like that:
Click here to view the original image of 665x503px.
Now we'll make the physical godmode for this monster.
Step 17.
Click on the tiny "Plus" Sign next to the "Info"
It should looks like this:
Step 18.
Click on "Body attack"
It should look like this now:
Click here to view the original image of 667x506px.
Step 19.
Change the value of 1 to 0
Click here to view the original image of 595x498px.
This is what it should look like after you changed it:
Click here to view the original image of 665x503px.
Step 20.
Click on "Apply Changed Value"
Click here to view the original image of 676x510px.
Step 21.
Click on the "Minus" sign next to the "Info"
Click here to view the original image of 674x510px.
Step 22.
Understand what I'm writing:
Any monster has from 0 to 8+ kind of attacks, each attack is cataloged by "Attack1"
"Attack2" ETC..
There are two kinds of attacks(At least that's what I meet so far)
the 1st kind has a range based on LT and RB which each one has it's own
X and Y coordination.
The second one is based on "SP" and on "R"
The SP is made of X and Y and the R from a single value.
Step 23.
Click on the "Plus" sing next to "attack1"
Click here to view the original image of 668x504px.
This is what it should look like:
Click here to view the original image of 662x504px.
Step 24.
Click on the "Plus" sign next to "Info" which located under the "attack1" tab.
Click here to view the original image of 674x508px.
It should look like this:
Click here to view the original image of 667x503px.
Step 25.
Click on the "Plus" next to "Range" which located under "Info" which located under "attack1"
Click here to view the original image of 667x501px.
It should look like this now:
Click here to view the original image of 670x511px.
As you can see it's the first kind of attack which based on "LT" and "RB"
Step 26.
Click on "lt"
Click here to view the original image of 672x504px.
This is what it should look like now:
Click here to view the original image of 672x508px.
Step 27.
Click on the number shown in x, in my case it's "-300"
Click here to view the original image of 671x510px.
Press on "0" on the keyboard.
This is what you should get:
Click here to view the original image of 672x509px.
Step 28.
Click on the number shown in "Y" in my case it's "-200"
Click here to view the original image of 668x507px.
Press on "0" in the keyboard
This is what it should look like:
Click here to view the original image of 669x507px.
Step 29.
Press on "Apply Changed Value"
Step 30.
Do the same for "rb"
Please don't tell me that's too hard to do alone
If people will need it I'll do it later.
Step 31.
Click on the "Minus" sign next to "attack1"
This is what it should look like:
Step 32.
Press on the "Plus" Sign next to the "attack2"
Click here to view the original image of 672x507px.
This is what it should look like:
Click here to view the original image of 670x508px.
Step 33.
Click on the "Plus" Sign next to the "Info" which located under "attack2"
Click here to view the original image of 672x517px.
This is what it should look like:
Click here to view the original image of 671x507px.
Step 34.
Click on the "Plus" sign next to the "range" tab which located under the "info" tab in "attack2" tab.
It should look like this:
Click here to view the original image of 672x511px.
We can see it's second kind of attack.
Step 35.
Click on the "r" which located under the "Range"
Step 36.
Change it's value to 0.
Step 37.
Click on "apply changed value"
Step 38.
Click on "sp" which located under the "range" tab next to the "r"
Step 39.
Change it's x value to 0.
Step 40.
Change it's y value to 0.
Step 41.
Click on "apply Changed value"
Step 42.
Click on "File"
Click here to view the original image of 672x510px.
Now save it in the Maple story directory.
If there are any Errors of "directory in use" or something similar just ignore them.
I'll add the last pictures in the next few hours.
I hope you'll enjoy.
 Originally Posted by giza123


